Importing Recipes
Bring recipes in from websites, pasted text, photos and social videos, and save them as .cook files you own.
You will use: cook.md converter, CookCLI, Cook Editor
Most people's recipes are scattered across browser bookmarks, screenshots, a cookbook shelf and a family group chat. Bookmarks rot, screenshots cannot be searched, and copied text loses its structure. Importing turns each of those into a .cook file: plain text, with the ingredients, quantities and timers marked up, that works in every Cooklang app and is yours to keep.
There are three ways to import, from quickest to most automated:
| Method | Best for | Needs |
|---|---|---|
Prefix the URL with cook.md/ | A recipe you found on the web right now | Nothing, not even an account |
| The converter page | Pasted text, cookbook photos, handwritten cards, YouTube and Instagram | A free cook.md account for text; Cook Basic for photos and social video |
cook import | Scripts and bulk imports | CookCLI and an OpenAI API key |
1. The quick way: prefix any URL
In your browser's address bar, put cook.md/ in front of the recipe's full address, including the https://:
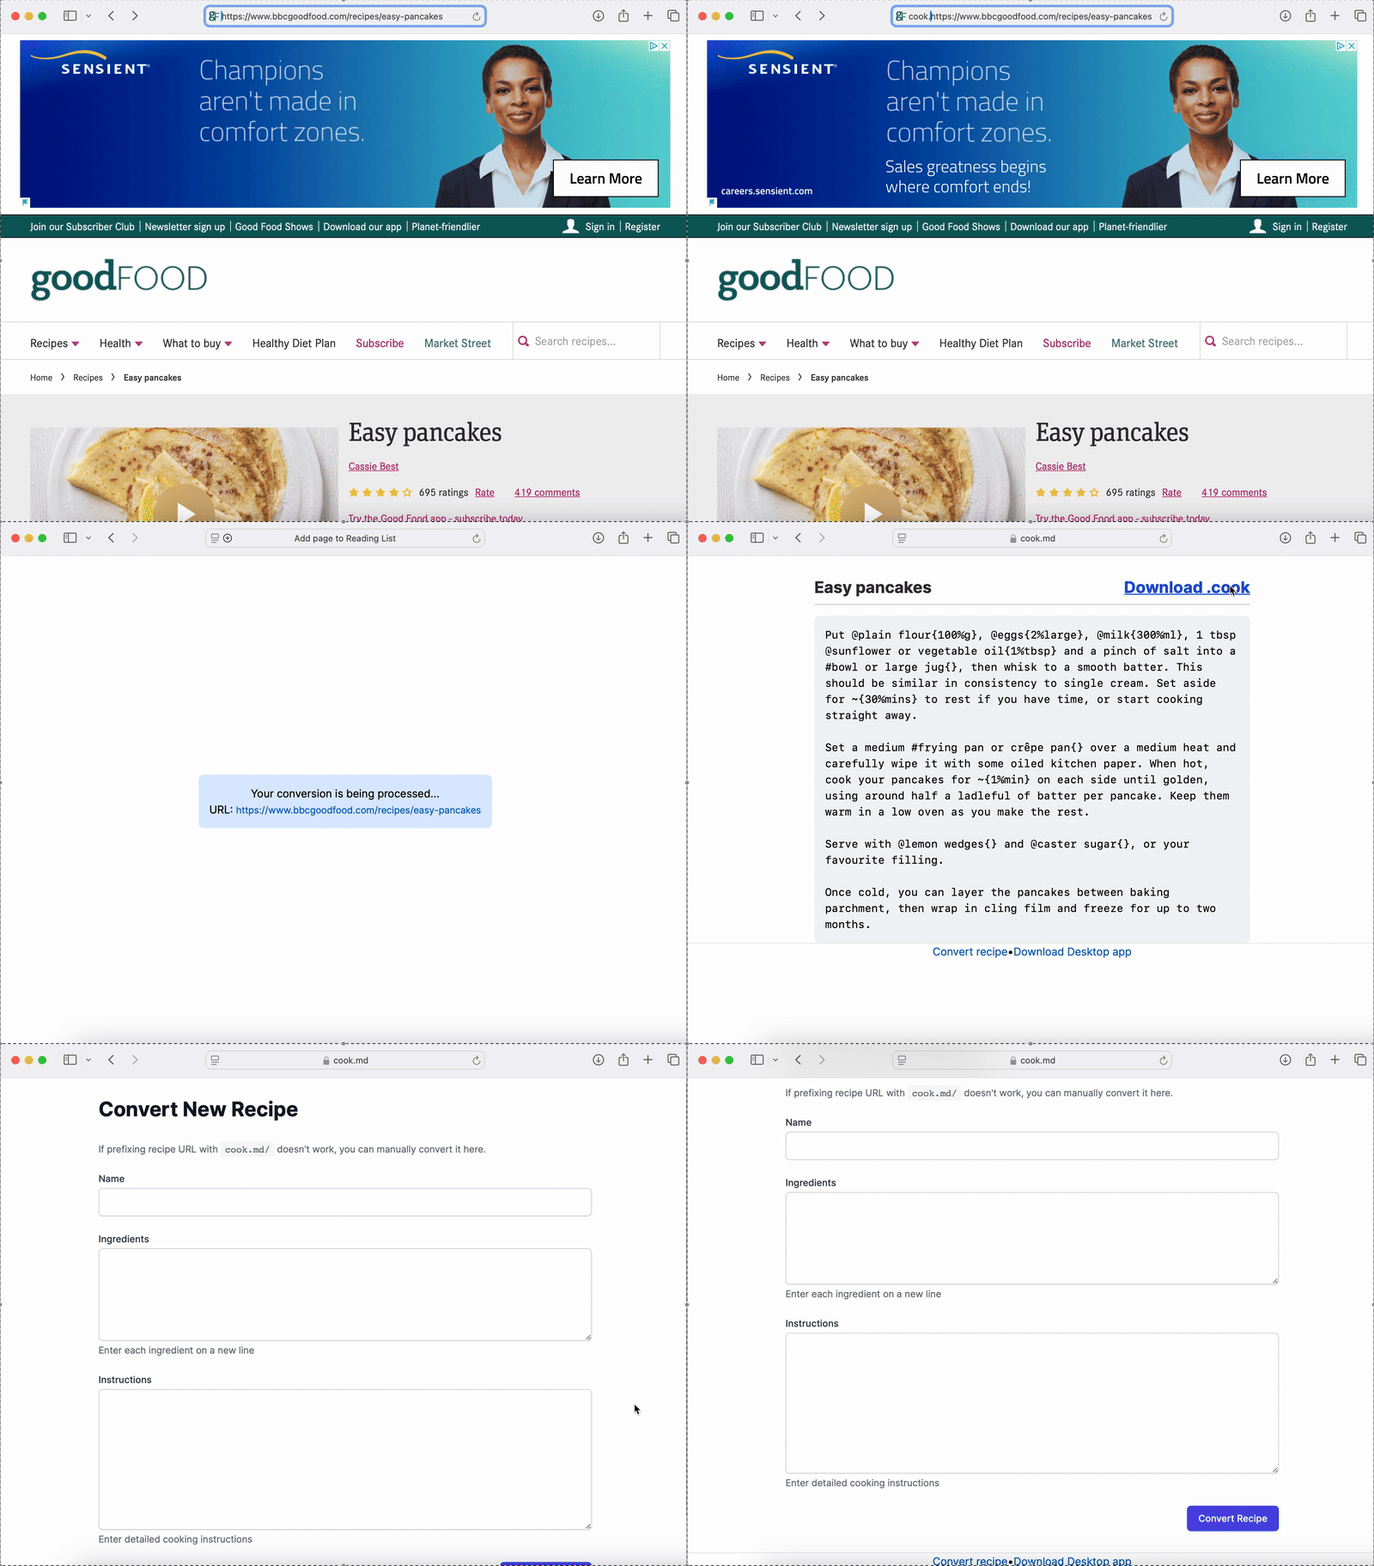
A few seconds later you get the recipe as Cooklang, with a Download .cook button. Recipe-site conversions are free, unlimited and need no sign-up. The converter reads the structured recipe data that most cooking sites publish, so it works on the large majority of them; if a page has no recipe markup, paste the text instead (step 2).
Save the file into your recipe folder and it shows up in the mobile app, the Cook Editor and cook server on the next sync.
2. Convert text, photos and videos
For anything that is not a recipe web page, open the converter at cook.md/cookifies/new. It has three tabs:
- URL, the same as the prefix trick, for sites where the address-bar method is awkward.
- Text: paste anything, from a forum comment to a recipe you dictated to your phone. Free with an account.
- Photos: upload up to 10 images of one recipe (JPEG, PNG, WebP or GIF, 10 MB in total). Cookbook pages, index cards, handwritten notes and screenshots all work.
YouTube, TikTok and Instagram links go through the URL tab; the converter pulls the transcript and caption and reconstructs the recipe from those.
Photo and social-video imports use a more expensive AI pipeline, so they come with a plan: one free try without an account, then 50 of each per month on Cook Basic (€4.99/month) and 200 on Cook Pro. Conversions that fail do not count. Recipe-site links and pasted text stay free on every plan. Details are on the cook.md pricing page.
3. Import from the command line
CookCLI can do the same conversion locally, which is handy for scripting a bulk import of your bookmarks:
The conversion step calls OpenAI with your own key, so it costs a fraction of a cent per recipe and works offline from cook.md entirely. Without a key, --skip-conversion still fetches the structured recipe data from the page as JSON, which you can convert however you like. See the cook import reference.
The Cook Editor has a fourth route: ask CookBot to import a URL, and it writes the file straight into your collection for you to review.
4. Check what you got
An import from the BBC Good Food link above comes back looking like this:
Worth a glance before you file it away:
- Front matter. The
sourceis filled in automatically so you always know where a recipe came from. Addtags:or atitle:if you want them; the canonical metadata list has the keys every app understands. - Ingredient names. Conversion keeps the site's wording. Rename
@creme fraicheto whatever your other recipes and youraisle.confcall it, so shopping lists merge properly.cook doctor aislelists anything that does not match. - Timers and cookware. Sites rarely mark these, so the converter infers them. Fix any it missed with
~{10%minutes}and#pan{}. - Servings. If the site did not state servings, set
servings:yourself so the recipe scales correctly in meal plans.
Run cook doctor validate after a batch import to catch syntax slips in one go.
See also
- Getting Started: where to keep the files and how to sync them
- Shopping Lists: what a good ingredient name buys you
- Meal Planning: put the imported recipes on the calendar
cook importreference